Translate

Showing posts with label Art. Show all posts

Tuesday, July 24, 2012

Love making "Nichos"


Here are the new "nichos" I just finished !

Nicho Amor
©2012 Lorena Angulo
Hand painted with acrylics and steel wire

Nicho Primavera
©2012 Lorena Angulo
Hand painted with acrylics

So far I have done only four nichos and still need much more to be able to display all my little figurine rings I made. I will do that sooner or later for now this is all I have and I am enjoying this new creative journey.

Saturday, July 14, 2012

Making a home for my little figurines

It been almost a year since I made my ring figurines and after spending a day cleaning up my studio I noticed they were all inside a box and I felt very sad about it.

I LOVE making them, they gave so much joy and looking at them all together inside a small box make me realize they deserve much better than that.


I took them out of the box and decided to make them a new home.


Looking around me studio, I saw something that will work perfect for what I wanted to make. I want to each have their own space and I am very sure I will have a great time making them.

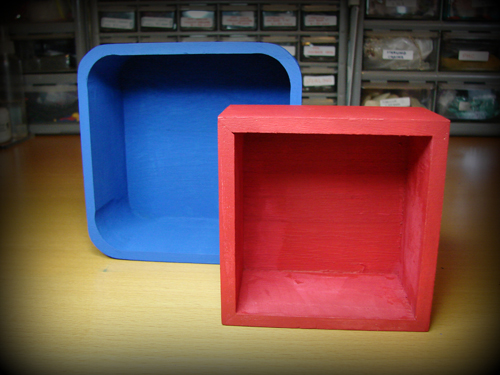
I painted some unfinished wood boxes in bright colors (of course!) and this is just the beginning of how their new home will look like.


I will post the "nichos" with my rings inside them when I finished making them!


Love,
Lorena ♥
 

Wednesday, May 23, 2012

Humor in Craft by Brigitte Martin


Since I learned about the title of this book, I was very curious to see what the book was going to be about.
Humor in Craft is a wonderful book showcasing incredible pieces of art, the title could not be more perfect. The author Brigitte Martin, who is the creator and editor of Crafthaus , features a wonderful array of art works from artists around the world.
The book itself is beautifully made and has great quality, a perfect book to have in any coffee table for everyone to enjoy. 

Every page is filled with great images of pieces made with all different types of materials and mediums, each representing the personal way every artists views and makes humor be part of their work.
Schiffer books is known for publishing very nice gallery type books and this one is no exception.
Brigitte Martin did a great job putting together this beautiful book, it is  definitively a book to have in any art studio or home of anyone who enjoys and appreciates art. 

Monday, May 7, 2012

I am the Lead Artist for Dia de los Muertos: La Ofrenda at Southwest School of Art

It is a great honor to have been invited to be the Lead Artist for Dia de los Muertos: La Ofrenda at the wonderful Southwest School of Art in San Antonio, Texas.


I am very happy to have the opportunity to share this wonderful tradition from my country, Mexico, with all the community in San Antonio. 


Southwest School of Art has been doing the altars for years and this time I will lead this wonderful event.

The invitation came at the best moment for me after having a very difficult summer in 2011 when I lost three very important family members.


This will give me the incredible opportunity to make a day of the dead altar to honor them and all my other family members that are not with us any more in body, but they will always be with us in spirit.


I will make my best to transmit why the altars are so important in our culture and why we see dead in a totally different way.

Hope you will come to see it if you live in San Antonio and the surrounding areas, I will love to see you there.


Friday, March 2, 2012

A wonderful get together with friends

I just had a wonderful long weekend with three incredible friends and artists. After all I have been this last year I was very eager to have this play time with them.


Lora Hart came to visit us from California, her first stop was in Austin where Vickie Hallmark lives, I met with them the following day and we sure had a super great time.


Vickie's home is beautiful and her studios and her where very inspirational. As soon as I got into her home I got into action and joined Lora in the enameling adventure.

We tried to get a picture with all of us together but it was not an easy task,
as you can see in these images.


We sure laughed  a lot trying to get one decent image!

Enameling was super fun, Vickie showed us how to enamel with a torch and use enamel paintings. It was incredible to see how easy and fast you can be able to add so much color and at the same time draw with enamels.


These are the pieces I painted with enamels, I sure know I have lots to practice still but to consider we made them in such a short period of time, I am happy with them.


Yes, I had to add lots of color.
It is impossible for me to be plain.

These are very small and I have no clue
how I was able to draw in such a small area.
That is my finger holding one of them!


Vickie also showed us how to make an inspirational book.
Vickie Hallmark, our teacher !
Lora Hart busy working.


Ready to start drawing !


Our next adventure was in San Antonio, I took them to some great galleries in the city and one of our fist stops was Equinox Gallery where we met the wonderful Laura Wood.

Laura came home to watch the Oscars with us and also to talked with us about her paper work and how she makes it.
Thanks Laura for sharing this with us !!


My husband was very happy to cook for us all.


Thanks my dear husband for the yummy food
you made for us ! ♥


Thank you Lora for coming to Texas to visit us, it was great to see you again and to see you create with us !! You are a talented Lady !! ♥
Thanks to Vickie and Laura for sharing your talent and for the laughter !! ♥


If you want see Lora's and Vickie's blog post about this adventure, click in the links.
Lora Hart's Blog 
Vickie Hallmark's Blog

Wednesday, February 22, 2012

Art Clay Scotland Jewellery Studio

I am very happy and honored to be one of the artists invited to exhibit my work at the beautiful Art Clay Scotland Jewellery Studio.
Emma Baird, who is an incredible artist, invited me to be part of her gallery.
The opening night will be on February 25 from 6 to 8 pm at Art Clay Scotland Jewellery Studio.

These are some of my pieces you can see there.

Monday, February 20, 2012

Remembrance Necklace

This necklace is very close to my heart. My family had a very difficult year on 2011, we lost three important members of our family in less than 3 months during the summer. Losing them was very painful and I lost the interest in making new pieces or designs. My heart was sad but little by little I have regained my passion for making and drawing my jewelry designs.


I made this necklace as a remembrance of my Soul-Brother Alberto, my Grandmother Felicitas and my dear Mother-in-law Ana Maria. To represent them in my necklace I decided to make three butterflies, each butterfly represents the soul of my dear family members who are now in a better place. In Mexico the butterfly symbolizes the soul of our family member who passed away.


The tree of life who is the center of my piece symbolizes the family and even though the pain is very hard we have to continue with our life and always have them in our hearts. On the back side of the piece I added the heart symbolizing our passion, love, gratitude and respect for them and for continuing with our life and their love they left behind.


Remembrance
©2012 Lorena Angulo
Bronze, coral and chrysocolla
Remembrance
(close up)
©2012 Lorena Angulo
Bronze, coral and chrysocolla
Remembrance
(back view)
©2012 Lorena Angulo
Bronze, coral and chrysocolla
Remembrance
©2012 Lorena Angulo
Bronze, coral and chrysocolla

Sunday, February 12, 2012

Powder Coating class with Michael Dale Bernard

I just had the most amazing and fun class this weekend. Michael Dale Bernard came to Southwest School of Art to teach Powder Coating.

I was very excited to learn this great technique because I love to add color to my work without using beads or stones.


Powder coating is a thermo set, polymer paint process. The coated is applied electro-statically and is then cured under heat to allow it to flow out into a smooth, durable surface.


Here is a great video Michael has about this topic:


The class was intensive but we all had such a great time. Michael is an incredible artists and a very good teacher, he was always willing to answer all the questions the students had.


©2010  Michael Dale Bernard  
Wood be Diamonds, brooch series
Steel, copper, wood, silver, powder coat, enamel paint


The first day of the class Michael let us used some of his found metal objects to start playing with powder coating. We were all eager to start adding some colors. Here you can see some examples that I made with the metal objects he let us used.


These two pieces are still in progress. I will make some
bronze metal clay pieces that will be riveted in the
center to attach all the pieces together.

For the second day I wanted to make something with my own creative style. Of course I had to create a heart and also I decided to powder coat some pieces I had for a necklace I am making.


©2012 Lorena Angulo
CORAZON
Copper, Bronze, powder coat
I am still working in this piece. I am making a necklace using a beautiful
button that was embroidered by Ellen Louwes.
(Copper, Embroidered button , powder coat.)

I am very excited to keep on playing with powder coating, the equipment is not very expensive and I can see myself doing much more of this in the future.


Michael photographed this picture of
my piece.

Tuesday, January 10, 2012

A look from Behind

I have always thought that the back of any jewelry piece is as important as the front. I always try to have something on the back of my pieces as a surprise for the wearer and also because I think it says a lot about the maker.
Most of the work I do has a detail on the back, I enjoy very much doing it.


CRUZ PASION (front and back view)
©2011 Lorena Angulo
Pure silver (PMC3), sterling and LOS patina
Soulful Heart (front and back view)
©2011 Lorena Angulo
Bronzclay, brass and coral
MILAGRO HEART pendant (front and back view)
©2010 Lorena Angulo
Pure Silver (PMC3) and LOS patina
CORAZON (front and back view)
©2009 Lorena Angulo
Brass and copper


Lately I started making brooches but I was very curious to see how other artists where making their pin backs and the back of their designs. I looked for inspiration everywhere but it was very hard to find images of the back side of the brooches.
Because I had a difficult time finding images of the back view of brooches I started thinking it will be great if I can create a collection of images from other artists as an inspirational tool.


I finally did it in my Pinterest page, I created a board about the back view of brooches called "Behind the brooch."

Come and take a look at the wonderful work by these artists. I am sure you will find it very interesting and helpful.


I took a class with the talented Gary Schott at Southwest School of Art and I learned how to make my first pin back with him. It was fun and I know I have to practice much more to feel more comfortable making my own pin backs and also start thinking of different ways I can design my own.
Back view of my first time making a pin back.
©2011 Lorena Angulo
Copper and steel wire


I also work a lot with metal clay and took the challenge to make my own pin back and pendant finding for my piece.
Back view of my first brooch/pendant combo
in pure silver (PMC3)
©2011 Lorena Angulo


How do you approach the design of your work ? Do you do something special for the back side? I will love to find out what your ideas about this topic are and if you want me to share an image of your back view of a brooch, let me know and I will add it to my board.


Love,
Lorena Angulo
Pin It

Thursday, December 15, 2011

The best little gifts for any art book lover: Lark Studio Series

I am so happy to share with you these little treasures.
As I mentioned before in my blog, I am a big lover of books and these small books are just the best I can imagine to give away to your friends and family.


Lark jewelry and beading had a great idea by making these small size books from their 500 Series.


The Lark Studio Series have 100 images from a corresponding title in the 500 Series. What I like best about these books is the beautiful pocket-sized, this makes them a perfect gift for this holidays and great stocking stuffers !
It is like having a tiny gallery in your hands !!


Each of the books have wonderful images and great print quality. You will love to see each one of them, the work is so inspirational and beautiful. No matter what type of medium you use, you will love them all.


Monday, December 12, 2011

My little Catrinas: Veronica, Dolores and Carmelita

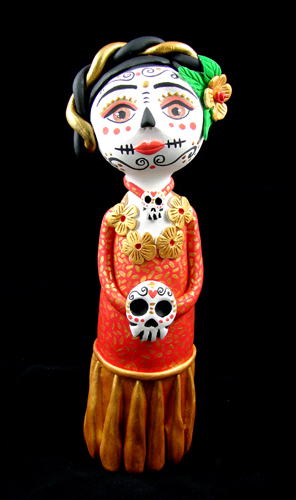
I finally finished my little Catrinas and I am very happy to see them with their own personalities and charm.
I present to you my "Little Catrinas."

Catrina CARMELITA
©2011 Lorena Angulo
Creative paperclay, acrylics, watercolors

Catrina DOLORES
©2011 Lorena Angulo
Creative paperclay, acrylics, watercolors

Catrina VERONICA
©2011 Lorena Angulo
Creative paperclay, acrylics, watercolors


Here you can see better their faces.
Catrinas DOLORES, CARMELITA and VERONICA
©2011 Lorena Angulo
Creative paperclay, acrylics, watercolors


Before and after images.
Catrinas CARMELITA ,VERONICA and DOLORES
©2011 Lorena Angulo
Creative paperclay, acrylics, watercolors
Pin It

Sunday, December 11, 2011

PMC Sterling

I got the great opportunity to play with the new PMC Sterling in November and I will love to share with all of you my experience and what I think about this new type of clay.
The clay looks very similar to the PMC Pro, the color is darker than the original PMC.

When I took the clay out I noticed the texture is great and very easy to work with, I decided to make a ring first and I made a snake with some of the clay to form the band for the ring. I used a plexiglass to make a long snake and I rolled it around a mandrel.
I went 3.5 sizes bigger to get the size I was looking for, a size 9.
I do not used any inserts in my ring when I fired it.

The PMC Sterling has a longer working time than the PMC3 (this is the type of clay I usually use in all my silver work.) In case the clay gets dry, you can add a little water and it gets soft very fast, almost immediately.

Carving is also great in this type of clay, it goes very easy. This is something I was very eager to try since most of my work has carving into the designs.
It carves very smoothly and with no problems at all.
TIP: Always save the carving scraps, these can make a great texture in your work, you will see it in my finished pieces at the end of this post.

Hand sculpting and forming is fantastic because the clay does not dry fast. This gives you the perfect time to hand form flowers or other things. I hand sculpt a lot in my work and I was very happy to see how easy it is to do it with PMC Sterling.

I also made earrings and a pendant. For the earrings I decided to add some fire in place CZs and I embedded two sterling jump rings into each earring.

I used my carving scraps to add texture in my heart pendant.

Because my pieces were more than 3mm thick I decided to fire them to a longer time that the suggested time in the package.

I first fired them in the open shelf, like we do with any other type of PMC (except PMC Pro), fast ramp to 1000F and hold there for 40 minutes. I waited until the pieces were cool inside the kiln; I also waited until the pieces were cool because I had fired two CZ Hessonite Garnets and we always have to be careful not to take the pieces very fast because the change of temperature may crack the stones.

The second firing was done with a steel pot and activated carbon. I added half an inch at the bottom and added my pieces in one layer, covered them with another half an inch and added the top of the pot.
I fired them inside the pot fast ramp to 1500F and hold for 45 minutes.
I left the pieces cool down inside the pot in the kiln before I took them out.

This is how the sterling looks like when you take them out of the kiln

I brushed them with soapy water and a brass brush. After this I added LOS Gel patina and brushed some of the patina off before I added the pieces inside a tumbler. 

I usually use a rotatory tumbler but this time I decided to give it a try to a magnetic tumbler. I was AMAZED at how fast this wonderful polishing machine can give your pieces a beautiful shine. I will have to start saving money to get myself a bigger size, since some of my pieces are bigger and do not fit in this size tumbler I have now. It is worth it !!!

These are all the pieces I made with 25 grams of PMC Sterling. They are not very thin, so if you make pieces that are thinner and small in size you will be able to make more out of the 25 grams of PMC Sterling.

The cost is very similar to the PMC3 and I feel it is great to have it like that. Now you will be able to create pieces that can be mark as .925 (sterling) and they will be stronger than fine silver.

I do want to mention I will be firing for almost two hours on the second step firing of the PMC Sterling. I want to be 100% sure they are totally fired to their best strength. I am saying this because I tested the little Calla Lily and I felt the piece was not fully sintered when I tried to curl up the point of the flower after fired. I will let you know of my future firings.

The pieces are beautiful and easy to polish and I am sure you will enjoy working with it.

EL CORAZON
©2011 Lorena Angulo
PMC Sterling
photo: Speedy Peacock

ROSAS
©2011 Lorena Angulo
PMC Sterling
photo: Speedy Peacock


FLOR
©2011 Lorena Angulo
PMC Sterling, pearls, CZ Hessonite  Garnets, embedded jump rings
photo: Speedy Peacock


Pin It
Related Posts Plugin for WordPress, Blogger...