Because of past experiences and testings with this clay, my firing schedule this time was different.
I programed my kiln for fast ramp up to 1550F and hold it there for 3 hours.
As you can see in the picture, the total firing time was 3:27.
I let the kiln cool down to 250F and took the pieces out of the pot.
I always do this part of the process very carefully because I do not want to break any pieces that may not have sintered.
As I suspected, only the small pieces (faces) sintered perfectly and my two big rings did not. I noticed the difference in the shrinkage.
I was not disappointed because I was expecting this to happen.
Sometimes when I put big pieces with smaller ones in the same pot, the bigger ones do not sinter. I always question why this was happening and Yesterday the wonderful artist Hadar Jacobson talked about this issue in her blog. I will do what she suggested and see how that works for me.
For the second firing of the rings I decided to change the holding time only for 2:30 instead of three hours.
The firing time was 2:57 minutes in total.
This time the two rings were perfectly sintered, with no problems at all.
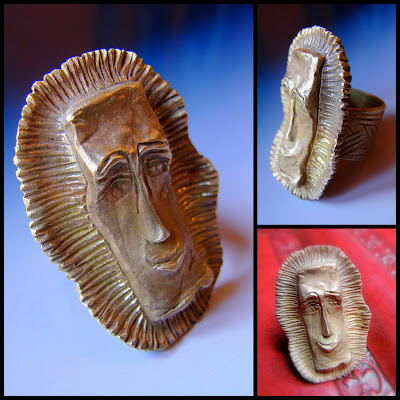
This ring was the one that I thought will have a bigger risk of not being a successful firing, because the top part of the ring has a lot of clay and it is very heavy.
I am happy with this ring, but next time I will think of a better way to use less clay on the top.
It is a heavy ring to wear, but I can manage it !!! ;-)
This ring was very fun to make and I love the way it ended up looking.
The band is very wide but it is comfortable to wear.
One thing I noticed too is that I do not need to go 3 numbers up in the size of the ring.
If I add only 2.5 sizes up it will be a good fit after the shrinkage.
"The most essential factor is persistence- the determination never to allow your energy or enthusiasm to be dampened by discouragement that must inevitable come."
~ James Whitcomb Riley


Lorena! Thank you for sharing your experiments with firing schedules. I have been fooling around with mine as well and hope to share on the blog soon! You are such a talented woman!
ReplyDeleteThank You, Lori ! ;-)
ReplyDeleteI will love to see what you have made.
Congrats on your successful show and your new clients. I am very happy for you ! ;-)
XOX
Wow! Still love the flower ring! So beautiful! :)
ReplyDeleteI just love the rings with the callie lillies on it looks amazing,x
ReplyDeleteThank You Lilla and Eve ! ;-)
ReplyDeleteI like it too.
Beautiful rings, Lorena!! Bravo!!!
ReplyDeleteBeautiful work, i especially love the flower ring! thanks for sharing the info too.
ReplyDeletej'adorerais appendre cette técnica de quelle merveille
ReplyDeleteMerci beaucoup Odilia !
ReplyDeleteJe pense que vous allez adorer l'art du Pâtes de Métal.
Just curious - why are you firing for so long? I have read the fast fire bronzeclay instructions and it says to ramp to 1525 in an hour, and then hold for an hour - that total firing time should be less than 2 hours. Whenever I've tried, I end up with blistering, which is apparently a sign that it's too hot, so how are you able to fire for 3 hours with no sintering?
ReplyDeleteVictoria,
DeleteEvery kiln acts differently, mine was not sintering the pieces at the schedule in the package. I needed to adapt the schedule to obtain fully sintered pieces and this is what works best for me.
I have not had any blistering and they are sintered.
What type of kiln are you using? Type of charcoal? Type of vessel?
Ceramic vessels and using Magic carbon will make the firing hotter than if you use coconut charcoal and steel vessel.
If you are using a Mini Speedy Kiln then you do not fire the pieces that long because you will get blisters.
Only, check if your kiln is heating at the temperature the digital monitor indicates, maybe if getting hotter inside than the number you see.
Delete